Contents

图像识别综述-从Inception到ResNet

存货, 介绍了从Inception系列到Resnet系列的发展历史以及基本理念和pytorch实现

Inception系列

1x1 卷积核的出处

出自颜水成组的Network in Network(ICLR 2014)中. 传统CNN使用线性滤波器, 为了捕捉高度非线性关系, 需要堆积卷积核, 计算量太大. 本文的贡献主要是

  1. 提出MLP conv层, 即用多层感知机建模卷积层之间的非线性关系, 可以
    1. 实现跨通道的交互和信息整合.
    2. 进行卷积核通道数的降维和升维,减少网络参数
    3. 具体到实现上, 可以用1x1 卷积核来近似实现. 普通卷积层+多个1*1卷积(followed by 激活层)等价于类patch级别的MLP
  2. 提出用全局均值池化提到全连接层: 比如输出$k$类, 最后一层conv layer就有$k$个channel, 最后经过全局均值池化输出一个$k$维向量
  3. 原作把MLP conv和maxout进行比较, 并表示

maxout network imposes the prior that instances of a latent concept lie within a convex set in the input space, which does not necessarily hold

Inception v1

https://my-imgshare.oss-cn-shenzhen.aliyuncs.com/inceptionv1_2.png 出自Google Brain. C Szegedy, CVPR 2015

  1. 整个网络由9个上图形成的block组成
  2. 第三个和第五个block有辅助分类器处理梯度消失问题
  3. 图中的1x1 conv降维不仅可以降低计算量, 还可以使得数据更加dense:

Clustering sparse matrices into relatively dense submatrices tends to give state of the art practical performance for sparse matrix multiplication

Inception v2/v3

出自Google Brain. C Szegedy, CVPR 2016.

  1. 论文首先提出了一些在构建深度网络时值得借鉴的意见.

    • 不要过早地引入Bottleneck. 并且Bottleneck之间过多地减少维度可能会造成信息的损失. 当卷积不会大幅度改变输入维度时,神经网络可能会执行地更好
    • Higher dimensional representations are easier to process locally within a network. 没太理解. 似乎是说特征维度越高, 越容易训练
    • 在卷积之前提前降维信息损失会很低. 这可能是因为相邻层之间有较大的协方差(strong correlation between adjacent unit), 所以可以先降维来降低运算量, 训练速度也会提升, 这就是Bottleneck概念的来源
    • 平衡网络的深度和宽度
  2. 提出了分解大卷积核为小卷积核的想法(Factorizing Convolutions with Large Filter Size).

    • 感受野相同的情况下, 将 5×5 的卷积分解为两个 3×3 的卷积, 降低了2.78倍运算量
    • 将 n*n 的卷积核尺寸分解为 1×n 和 n×1 两个卷积
  3. 提出Bottleneck概念, 先降维再升维. 这个概念取自于自编码器? 例如:

    • 输入输出皆为256 channel的卷积层, 由3x3x256个卷积核组成
    • 转换成一组1x1x64, 3x3x64, 1x1x256维的卷积层, 计算量降低了接近10倍

最后提出了Label Smoothing来对网络输出正则化, 也是率先使用了batch norm的网络之一 v3是同一篇论文提出的, 增加了RMSProp优化器, Factorized 7x7 卷积, 辅助分类器使用了 BatchNorm

Inception v4

使用了更多骨骼惊奇的building block, 并且结合了resnet的跳跃式结构.

Xception

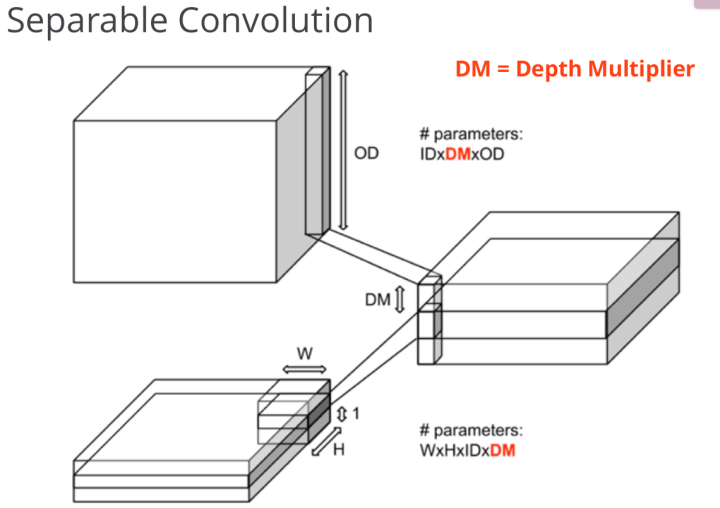
Xception: Deep Learning with Depthwise Separable Convolutions 某层卷积层输入channel为$16$, 输出channel为$32$

  1. 使用32个$k \times k \times 16$的卷积核, 参数数量为: $$32 \times k \times k \times 16$$
  2. 使用$16$个$k \times k \times 1$的卷积核分别在$16$个channel上独自进行卷积, 输出为$16$个channel, 再用$32$个$1 \times 1 \times 16$的一维卷积核, 输出为$32$个channel, 参数数量为: $$16 \times k \times k \times 1 + 32 \times 1 \times 1 \times 16$$

由此可见参数量被大大减小. 在实现上, Depthwise Conv等价于一个$k \times k \times 16$的卷积核在尚未sum各个channel的值之前就输出成16个channel, 然后再接$32$个Pointwise Conv, 即$1 \times 1$卷积核

注: Depthwise Conv在pytorch中可以用groups参数实现:

1
2
# A Depthwise Conv layer
nn.Conv2d(128, 128, kernel_size=3, groups=128)

ResNet

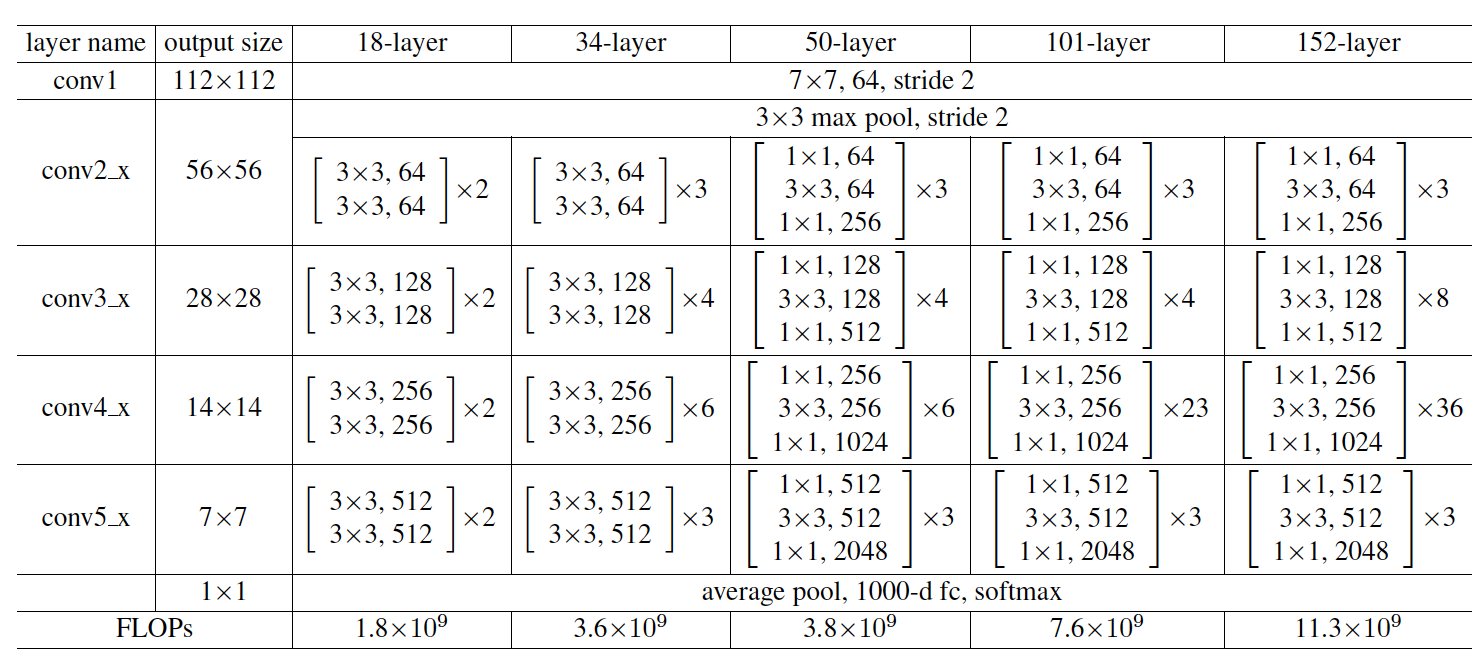
resnet由四个stage组成, 而每个stage又由数个bottleneck组成. bottleneck结构借鉴了Inception v2

一个Bottleneck由3层CBR(conv-batch norm-relu)层组成, 见下:
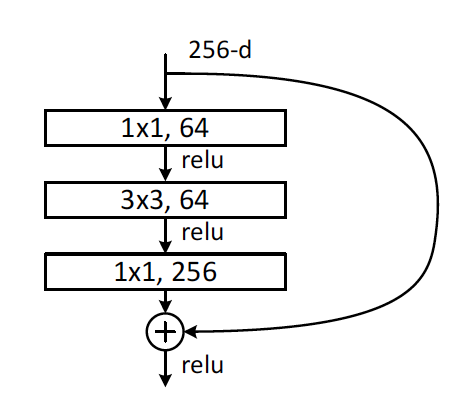
https://my-imgshare.oss-cn-shenzhen.aliyuncs.com/bottleneck.png

同时一个stage由若干重复bottleneck组成, 整个网络由4个stage组成

  1. 每个stage的开头第一个bottleneck的3x3卷积层的步长是2, 使得每个stage将feature map尺寸缩小一半
  2. 每个stage的开头第一个bottleneck需要处理上一个stage的输出通过shortcut与该bottleneck的输出相加时通道不匹配的问题, 故需要增加一层Conv-BN处理通道一致性
https://my-imgshare.oss-cn-shenzhen.aliyuncs.com/resnet.png

构造Bottleneck:

 1
 2
 3
 4
 5
 6
 7
 8
 9
10
11
12
13
14
15
16
17
18
19
20
21
22
23
24
25
26
27
28
29
30
31
32
33
34
35
36
class Bottleneck(nn.Module):
    """
    ResNet 50/101 BottleNeck
    """
    def __init__(self, in_planes, k_planes, stride=1):
        """
        :param in_planes: input channels
        :param k_planes: conv kernel output channels in each stage
        :param stride: the 3x3 kernel in a stage may set to 2
                       only in each group of stages' 1st stage
        """
        super(Bottleneck, self).__init__()
        self.conv1 = nn.Conv2d(in_planes, k_planes, 1, bias=False)
        self.bn1 = nn.BatchNorm2d(k_planes)
        self.conv2 = nn.Conv2d(k_planes, k_planes, 3, padding=1, stride=stride, bias=False)
        self.bn2 = nn.BatchNorm2d(k_planes)
        self.conv3 = nn.Conv2d(k_planes, k_planes * 4, 1, bias=False)
        self.bn3 = nn.BatchNorm2d(k_planes * 4)
        self.relu = nn.ReLU(inplace=True)
        self.shortcut = nn.Sequential()  # empty Sequential module returns the original input

        if stride != 1 or in_planes != k_planes * 4:  # tackle input/output size/channel mismatch during shortcut add
            self.shortcut = nn.Sequential(
                nn.Conv2d(in_planes, k_planes * 4, 1, stride=stride, bias=False),
                nn.BatchNorm2d(k_planes * 4)
            )

    def forward(self, x):
        out = self.relu(self.bn1(self.conv1(x)))
        out = self.relu(self.bn2(self.conv2(out)))
        out = self.bn3(self.conv3(out))

        out += self.shortcut(x)
        out = self.relu(out)

        return out

构造第一层conv1

1
2
3
4
5
6
7
def _make_conv1():
    return nn.Sequential(
        nn.Conv2d(3, 64, 7, stride=2, padding=3, bias=False),  # (224-7+2*3) // 2 +1 = 112
        nn.BatchNorm2d(64),
        nn.ReLU(inplace=True),
        # nn.MaxPool2d(kernel_size=3, stride=2, padding=1) # shrink to 1/4 of original size
    )

构造四个stage

1
2
3
4
5
6
def _make_stage(ch_in, ch, num_blocks, stride=1):
    layers = []
    layers.append(Bottleneck(ch_in, ch, stride))  # only the first stage in the module need stride=2
    for i in range(1, num_blocks):
        layers.append(Bottleneck(ch * 4, ch))
    return nn.Sequential(*layers)

几个小问题

1大量使用BatchNorm. BN应该在激活函数之前还是之后呢? - https://zhuanlan.zhihu.com/p/28124810 - https://www.zhihu.com/question/64494691 - https://zhuanlan.zhihu.com/p/28749411 2. 为什么resnet? - https://www.zhihu.com/question/64494691

ResNeXt

核心思路是在Bottleneck中:

  1. 利用1x1卷积核, 先降维再升维的方式降低计算开销(下图c)
  2. 在降维过程中, 利用Xception的Depthwise Conv进一步降低计算开销(下图b)
    • 将输入的128通道分成32组, 每组4个通道
    • 对每组使用4个核为3x3的卷积层, 输出4个通道
    • 将32个卷积层的4x32=128个通道concat为128个输出层

https://my-imgshare.oss-cn-shenzhen.aliyuncs.com/resnext.png

https://my-imgshare.oss-cn-shenzhen.aliyuncs.com/v2-854177e100d7d48dc5dda40306f5b311_hd.png

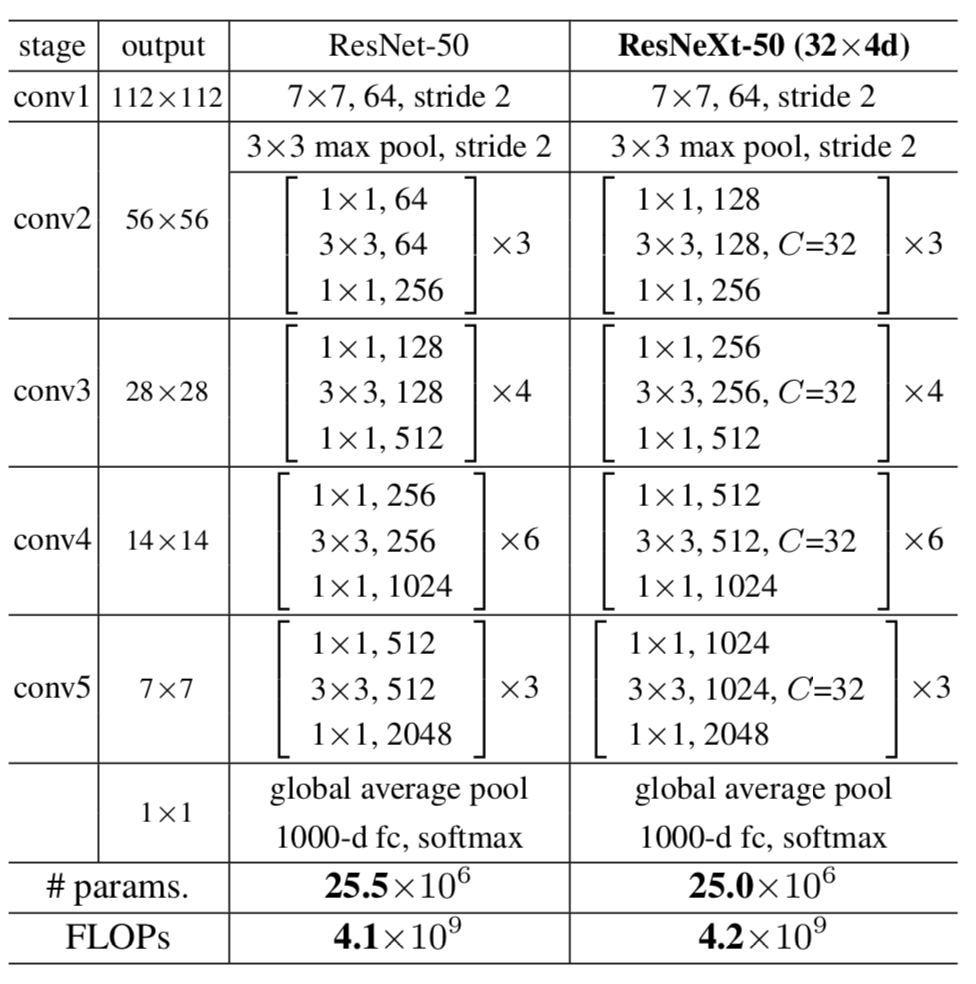
与ResNet的比较: https://my-imgshare.oss-cn-shenzhen.aliyuncs.com/resnextcompare.png 构造Bottleneck, 和resnet相比改动很简单, 参考上图最右边的实现, 在每个stage的第二个卷积层启用group参数即可.

SENet
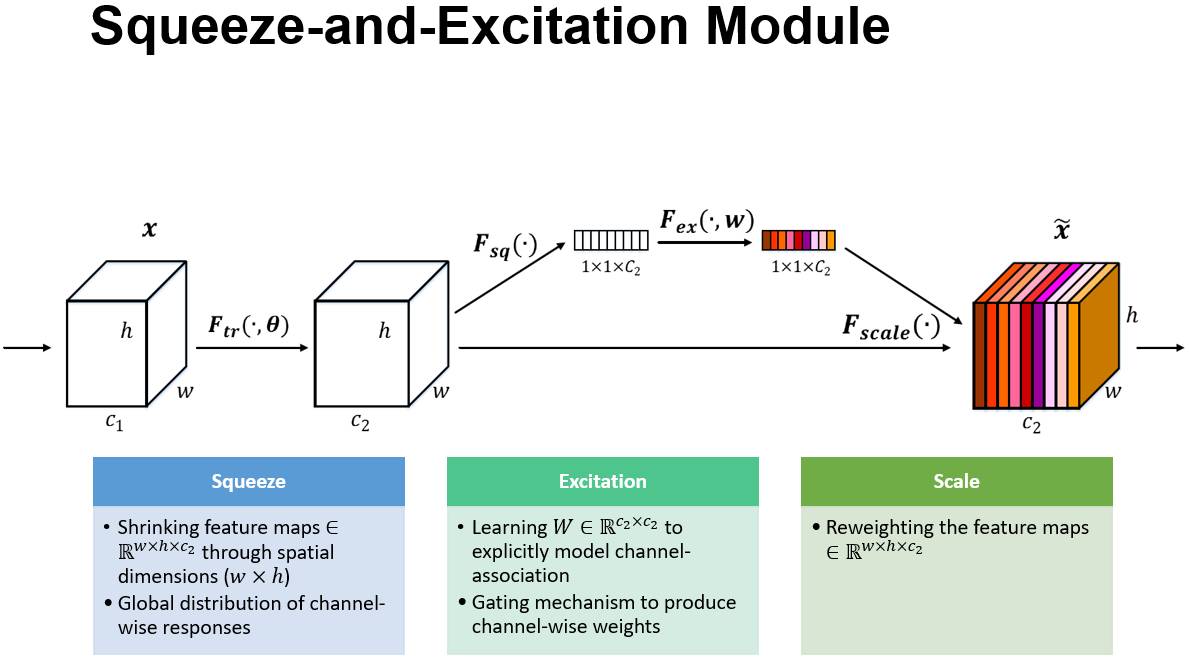
http://img.mp.itc.cn/upload/20170802/247d198e8ef64a7fa040887b6f0ee0e0_th.jpg 大体思路是对各个channel(或者说整张图片)的一个attention, 个人理解就是结合了文章开头NIN的理念和Attention机制

  1. 通过全局均值池化将$C$个channel变成$C$维向量.
  2. 第一个FC层称为squeeze层, 将维度压缩为$reduction$, 使用ReLU, 起到LSTM中门控的作用
  3. 第二个FC层称为excitation层, 将维度还原为$C$, 使用Sigmoid, 起到输出权重作用, 重新赋予每个channel权重. 核心思想是建模通道间的相关性
  4. 最后输出的向量作为各层的权重乘到输出上
 1
 2
 3
 4
 5
 6
 7
 8
 9
10
11
12
13
class SEScale(nn.Module):  
    def __init__(self, channel, reduction=16):  
        super(SEScale, self).__init__()  
        self.fc1 = nn.Conv2d(channel, reduction, kernel_size=1, padding=0)  
        self.fc2 = nn.Conv2d(reduction, channel, kernel_size=1, padding=0)  
  
    def forward(self, x):  
        x = F.adaptive_avg_pool2d(x,1)  
        x = self.fc1(x)  
        x = F.relu(x, inplace=True)  
        x = self.fc2(x)  
        x = F.sigmoid(x)  
        return x

带SEScale的ResNext:

 1
 2
 3
 4
 5
 6
 7
 8
 9
10
11
12
13
14
15
16
17
18
19
20
21
22
23
24
25
26
27
class SENextBottleneckBlock(nn.Module):
    def __init__(self, in_planes, planes, out_planes, groups, reduction=16, is_downsample=False, stride=1):
        super(SENextBottleneckBlock, self).__init__()
        self.is_downsample = is_downsample

        self.conv_bn1 = ConvBn2d(in_planes,     planes, kernel_size=1, padding=0, stride=1)
        self.conv_bn2 = ConvBn2d(   planes,     planes, kernel_size=3, padding=1, stride=stride, groups=groups)
        self.conv_bn3 = ConvBn2d(   planes, out_planes, kernel_size=1, padding=0, stride=1)
        self.scale    = SEScale(out_planes, reduction)

        if is_downsample:
            self.downsample = ConvBn2d(in_planes, out_planes, kernel_size=1, padding=0, stride=stride)


    def forward(self, x):

        z = F.relu(self.conv_bn1(x),inplace=True)
        z = F.relu(self.conv_bn2(z),inplace=True)
        z =        self.conv_bn3(z)

        if self.is_downsample:
            z = self.scale(z)*z + self.downsample(x)
        else:
            z = self.scale(z)*z + x

        z = F.relu(z,inplace=True)
        return z