这是个课程报告
1. 课程贡献: pull requests(2次)
#更新项目1手写体识别的README
#221 sklearn改进
-
将数据集更换为train2.csv(数据集容量提升到了8000), 使用相同脚本预测性别时准确率从70%提升到了80%, 说明在2000以上的样本容量对准确率依然有影响
-
数据预处理, 使用平均值填充缺失值
1
2
3
4
5
6
7
|
def load_data():
    # 数据集已合并, 去掉了标签行, sex预处理为数字
    df = pd.DataFrame(pd.read_csv('train2.csv', names=class_names_train2))
    # 转化为字符串
    df = df.convert_objects(convert_numeric=True)
    # 使用平均值填充缺失值
    df = df.fillna(df.mean())
|
- 按照年龄将数据集分为不同年龄段分段进行训练
 1
 2
 3
 4
 5
 6
 7
 8
 9
10
11
12
13
14
15
16
17
18
19
20
21
22
|
def split_data(df, low, high):
    """
    :param df: 输入的dataframe
    :param low: 截取区间的低阈值
    :param high: 截取区间的高阈值(不包含)
    :return: 截取的dataframe
    """
    df_lowcut = df[df['age'] >= low]
    df_cut = df_lowcut[df_lowcut['age'] < high]
    selected_names = [x for x in class_names_train2 if (x != 'age' and x != 'sex')]
    x_data = df_cut[selected_names].as_matrix()
    y_data = df_cut['age'].as_matrix()
    # 用平均值填充nan
    def fill_nan(np_array):
        col_mean = np.nanmean(np_array, axis=0)
        nan_ids = np.where(np.isnan(np_array))
        np_array[nan_ids] = np.take(col_mean, nan_ids[1])
        return np_array
    x_data = fill_nan(x_data)
    print 'x有没有nan值:', np.any(np.isnan(x_data))
    print 'y有没有nan值:', np.any(np.isnan(y_data))
    return x_data, y_data
|
-
区分年龄段之后, 预测结果如下
-
0-25岁

 训练集准确率为: 0.983532934132
测试集准确率为: 0.906040268456
-
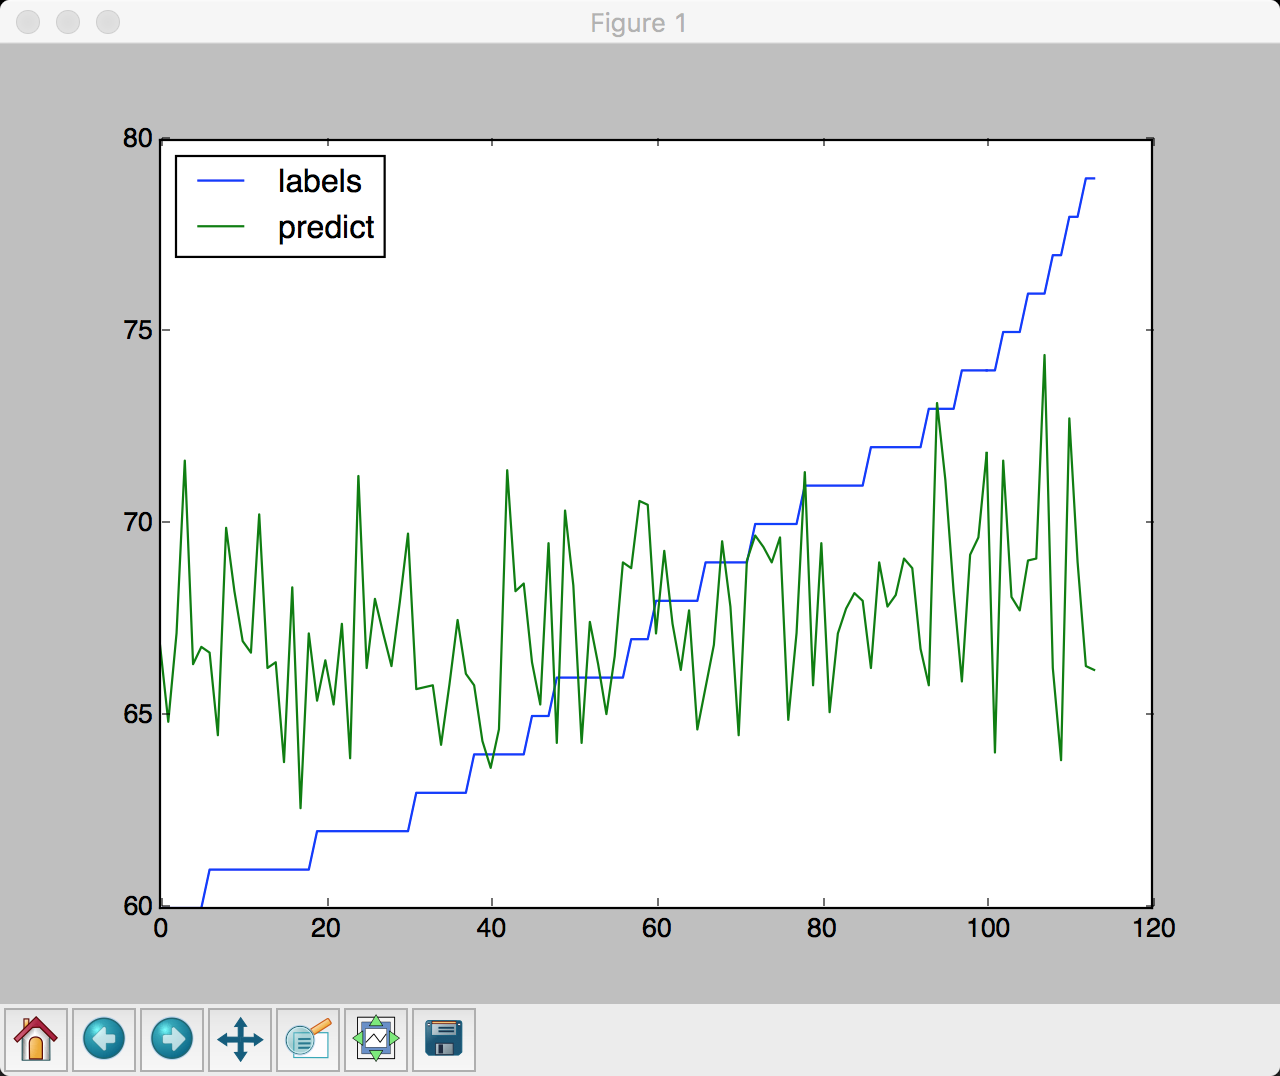
25-60岁

 训练集准确率为: 0.843848874
测试集准确率为: 0.373534338358
-
60-80岁

 训练集准确率为: 0.977473065622
测试集准确率为: 0.649122807018
由此可见, 区分不同年龄段之后预测准确率有了极大提升, 尤其是低年龄段, 说明不同年龄段的分布不是一样的.
2. 课程贡献: Presentation(2次)
2.1 Adaboost理论简介
强可学习和弱可学习
- 在概率近似正确(PAC)学习框架中, 一个类如果存在:
- 一个多项式复杂度的学习算法,正确率略大于随机猜测(例如二分类问题中大于1/2),称弱可学习的类
- 一个多项式复杂度的学习算法,并且正确率很高,称强可学习的类
- Kearns和Valiant证明了强可学习和弱可学习是等价的
- Adaboost算法就是将弱学习器组成强学习器的算法
组合弱分类器
-
测试集:
$$T = \left\lbrace (x^{(1)}, y^{(1)}), (x^{(2)}, y^{(2)}), \cdots, (x^{(N)}, y^{(N)})\right\rbrace, \quad
x \in \chi \subseteq R^N, y \in \lbrace +1, -1 \rbrace \\
\text{with weights: } D_i = (w_{i1}, w_{i2}, \cdots, w_{iN})$$
-
分类器
$$G_m(x): \chi \to \lbrace +1, -1\rbrace, \quad G(x) = \sum\limits^M_{i=1} \alpha_m G_m(x) \\
\text{with weights: } A = (\alpha_{1}, \alpha_{2}, \cdots, \alpha_{M})
$$
AdaBoost 算法
输入: 训练集 $T$, m个弱分类器 $G_m(x)$
输出: 集成分类器 $G(x)$
-
初始化权重:
$$ D_1 = (w_{11}, w_{12}, \cdots, w_{1N}), \quad w_{1i} = \frac{1}{N} $$
-
For $m = 1,2, \cdots, M$:
(a) 对具有权重分布 $D_m = (w_{m1}, w_{m2}, \cdots, w_{mN})$ 的训练集 $T$ 训练出弱分类器 $G_m(x)$
(b) 计算弱分类器 $G_m(x)$ 在 $T$ 上的误差率:
$$ e_m = P(G_m(x^{(i)}) \neq y^{(i)}) = \sum\limits^N_{i=1} w_{mi}I(G_m(x^{(i)}) \neq y^{(i)}) \tag{1}$$
(c) 计算 $G_m(x)$ 的系数 $\alpha_m$:
$$ \alpha_m = \frac{1}{2} ln \frac{1-e_m}{e_m} \tag{2}$$
AdaBoost 算法
(d) 更新训练集的权重分布 $D_{m+1}$:
$$ D_{m+1} = (w_{m+1, 1}, w_{m+1, 2}, \cdots, w_{m+1, N}) $$
$$w_{m+1, i} =\begin{cases}
\frac{w_{mi}}{Z_m} e^{-\alpha_m}, & G_m(x^{(i)}) = y^{(i)} \\ \\
\frac{w_{mi}}{Z_m}e^{\alpha_m}, & G_m(x^{(i)}) \neq y^{(i)}
\end{cases}
= \frac {w_{mi}e^{-\alpha_m y^{(i)} G_m(x^{(i)})}} {Z_m} \tag{3}$$
$$Z_m = \sum\limits^N_{i=1}w_{mi}e^{-\alpha_m y^{(i)} G_m(x^{(i)})} $$
这里 $Z_m$ 是规范化因子, 使得 $D_{m+1}$ 成为一个概率分布, 保证了 $\sum\limits^N_{i=1}w_{m+1, i} = 1$
最后,组合所有弱分类器 $G_m(x)$:
$$ f(x) = \sum\limits^M_{i=1} \alpha_m G_m(x), \quad G(x) = sign(f(x))$$
实现细节
注意到每次迭代测试集中的样本都具有不同的权重, 实现方法有:
- 在每个弱分类器计算损失函数的时候, 对相应样本的loss乘以权重
- 不需要修改弱分类器的方案: 直接修改训练集
- 每次迭代都使用 $D_i$ 作为概率分布从原始数据集中生成新的数据集进行训练
直观解释

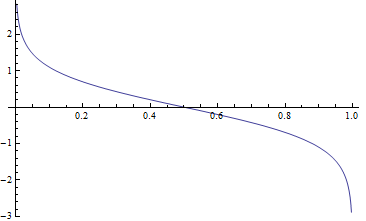
- 对模型来说, 这里显示了弱分类器 $G_m(x)$的权重, $ \alpha_m = \frac{1}{2} ln \frac{1-e_m}{e_m} $ 与误差 $e_m$, 变化的关系. 显然更精确的弱分类器具有更大的权重
- 相反, 对训练集数据来说, 从 (3) 可知被误分类的样本的权重会增加, 被正确分类的样本权重会降低, 增加/降低的速度都是指数级别的.
加法模型与前向分步算法
考虑一个与adaboost相似的累加模型 (additive model) :
$$
f(x) = \sum\limits_{m=1}^M \beta_m b(x; \gamma_m)
$$
in which $b(x; \gamma_m)$ 是基分类器, $\gamma_m$ 是基分类器的参数, $\beta_m$ 是基分类器的权重.
为了最小化损失函数, 提出前向分步算法(forward stagewise algorithm), 每一步只学习一个基函数及其系数, 即每一步中把其他所有模型看成常数, 只优化一个模型. 这是前向分步算法的核心概念.
前向分步算法
输入: 训练集 $T = \lbrace (x^{(1)}, y^{(1)}), (x^{(2)}, y^{(2)}), \cdots, (x^{(N)}, y^{(N)}) \rbrace$, 损失函数$L(y, f(x))$, 基分类器 $b(x; \gamma)$
输出: 累加模型 $f(x)$, 初始化 $f_0(x) = 0$
- For $m = 1,2,\cdots,M$:
- 最小化损失函数:
$$ (\beta_m, \gamma_m) = arg\min\limits_{\beta, \gamma} \sum\limits_{i=1}^N L(y^{(i)}, f_{m-1}(x^{(i)}) + \beta b(x^{(i)};\gamma)) $$
- 更新 $f(x)$:
$$ f_m(x) = f_{m-1}(x) + \beta_m b(x^{(i)};\gamma_m)$$
- 生成累加模型:
$$ f(x) = \sum\limits_{m=1}^M \beta_m b(x; \gamma_m) $$
Adaboost与前向分步算法
以下证明, adaboost算法实际上就是一个使用累加模型, 且损失函数为指数函数的模型
假设损失函数为指数损失函数(exponential loss function):
$$ L(y, f(x)) = exp(-yf(x)) $$
在第$m$次迭代中:
$$
f_m(x) = f_{m-1}(x) + \alpha_mG_m(x), \\
\text{其中 } f_{m-1}(x) = \sum\limits_{m=1}^{M-1} \alpha_mG_m(x)
$$
为了最小化
$$\begin{align}
(\alpha_m, G_m) & = arg\min\limits_{\alpha, G} \sum\limits_{i=1}^N exp \left\lbrace -y^{(i)}(f_{m-1}(x^{(i)}) + \alpha_m G_m(x^{(i)}))\right\rbrace \\
& = arg\min\limits_{\alpha, G} \sum\limits_{i=1}^N w_{mi} exp \left\lbrace -y^{(i)} \alpha_m G_m(x^{(i)}) \right\rbrace
\end{align}
$$
其中 $w_{mi} = exp(-y^{(i)} f_{m-1}(x^{(i)}))$, 则损失函数仅依赖于$\alpha$ 和 $G$.
为了证明算法中的$\alpha_m^*, G_m^*$ 与adaboost中的 $\alpha_m, G_m$ 等价:
- 对任意 $\alpha > 0$, 使损失函数最小的 $G_m^*(x)$ 由下式得到:
$$
G_m^*(x) = arg\min\limits_{G} \sum\limits_{i=1}^N w_{mi} I(y^{(i)} \neq G(x^{(i)}))
$$
此分类器即为adaboost算法中的基分类器, 即 $G_m^*(x) = G_m(x)$
- 求 $\alpha_m$
$$\begin{align}
L(\alpha, G_m) & = \sum\limits_{i=1}^N w_{mi} exp \left\lbrace -y^{(i)} \alpha G_m(x^{(i)}) \right\rbrace \\
& = (e^{\alpha} - e^{-\alpha}) \sum\limits_{\neq} w_{mi} + e^{-\alpha} \sum\limits w_{mi}
\end{align} $$
其中$\sum\limits_{\neq}$ 是$\sum\limits_{y^{(i)} \neq G(x^{(i)})}$的缩写, $\sum$ 是$\sum\limits_{i=1}^N$ 的缩写
对$\alpha$求导并使导数为0, 即得到使损失函数最小的$\alpha$
$$\frac {\partial L(\alpha, G_m)} {\partial \alpha} = (e^{\alpha} + e^{-\alpha}) \sum\limits_{\neq} w_{mi} - e^{-\alpha} \sum\limits w_{mi} = 0$$
s.t. $$(e^{\alpha} + e^{-\alpha}) \frac{\sum\limits_{\neq} w_{mi}}{\sum\limits w_{mi}} - e^{-\alpha} = 0$$
s.t. $$(e^{\alpha} + e^{-\alpha}) \epsilon_m - e^{-\alpha} = 0$$
s.t. $$ \alpha^* = \frac{1}{2}ln \frac{1-\epsilon_m}{\epsilon_m} $$
其中 $\epsilon_m = \frac{\sum\limits_{\neq} w_{mi}}{\sum\limits w_{mi}}$, 即为 $G_m^*(x)$ 的损失函数
最后我们得到 $(\alpha_m, G_m)$ 是和adaboost中的一致的
2.2 Adaboost Code Review
数据集介绍
Horse Colic Data Set
- 马是否得了疝气的预测
- 数据集大小: 68
- 特征数目: 24
- 数据集是否完整: 有缺失数据, 用0补全
项目结构
- 基分类器使用决策树桩
- 基分类器的数据结构: 采用字典结构
- 基分类器的训练: 损失函数为0-1损失函数, 找到最好阈值
- adaboost算法
- 集成分类器的数据结构: 采用类保存权重list和基分类器list
- 算法训练
- 保存/载入模型的功能: 读取/保存为json文件
- 模型评估: 准确率和ROC曲线
基分类器:决策树桩
 1
 2
 3
 4
 5
 6
 7
 8
 9
10
11
12
13
14
15
16
17
18
19
20
21
|
    import numpy as np
    def stump_classifier(data_matrix, feature_index, threshold, rule='lt'):
        """
        :param: data_matrix: 测试集, 样本按行排列
        :param: feature_index: 用来分类的特征序号
        :param: threshold: 阈值
        :param: rule: 规则, 默认情况下是小于阈值被分类为-1.0
        决策树桩
        输入: 测试集
        输出: 预测结果(以1,-1标注)
        """
        results = np.ones((data_matrix.shape[0], 1))
        feature_values = data_matrix[:, feature_index]
        if rule == 'lt':
            results[np.where(feature_values <= threshold)[0]] = -1.0
        elif rule == 'gt':
            results[np.where(feature_values > threshold)[0]] = -1.0
        else:
            print('ERROR: rule not recognized, use default as lt.')
            results[np.where(feature_values <= threshold)[0]] = -1.0
        return results
|
基分类器训练过程: 寻找最小损失的阈值
 1
 2
 3
 4
 5
 6
 7
 8
 9
10
11
12
13
14
15
16
17
18
19
20
21
22
23
24
25
26
27
28
29
30
31
32
33
34
35
36
37
38
39
40
41
|
    import numpy as np
    def create_stump(data_matrix, labels, data_weights, step_number=10):
        """
        :param: data_matrix: 测试集, 样本按行排列
        :param: labels: 标注
        :param: data_weights: 训练集样本权重
        :param: step_number: 迭代次数, 亦即设置阈值每一步的步长
        :return: stump: 决策树桩, 用dict实现
        :return: return_prediction: 预测的标注值
        :return: min_error: 最小损失函数值
        决策树桩训练函数
        输入: 训练集, 训练集权重, 迭代次数
        输出: 决策树桩, 输出值, 最小损失
        """
        m, n = np.shape(data_matrix)
        stump = {}
        return_prediction = np.zeros((m, 1))
        min_error = np.inf

        # 遍历特征
        for i in range(n):
            min_value = data_matrix[:, i].min()
            max_value = data_matrix[:, i].max()
            step_size = (max_value - min_value) / float(step_number)
            # 按步长设定阈值
            for j in range(-1, step_number + 1):
                for rule in ['lt', 'gt']:
                    threshold = min_value + j * step_size
                    prediction = stump_classifier(data_matrix, i, threshold, rule)
                    # is_error用来存放是否错误的标记, 即I(prediction = labels)
                    is_error = np.ones((m, 1))
                    is_error[prediction == labels] = 0
                    # 损失乘以归一化的权重
                    weighted_error = np.dot(data_weights.T, is_error)
                    if weighted_error < min_error:
                        min_error = weighted_error
                        return_prediction = prediction.copy()
                        stump['feature_index'] = i
                        stump['threshold'] = threshold
                        stump['rule'] = rule
        return stump, return_prediction, min_error
|
集成分类器数据结构
1
2
3
4
5
6
7
8
9
|
    import numpy as np
    class Model:
        """
        :return: model_weights: np数组,弱分类器权重
        :return: model_list: weak model list, 其中每个弱分类器用dict实现
        """
        def __init__(self, size=10):
            self.model_weights = np.zeros((size, 1))
            self.model_list = []
|
Adaboost训练集成分类器
 1
 2
 3
 4
 5
 6
 7
 8
 9
10
11
12
13
14
15
16
17
18
|
    import numpy as np
    def adaboost_train(data_matrix, labels, iteration=40):
        """
        :param: data_matrix: (m,n) np数组, 训练集, 样本按行排列
        :param: labels: (m,1) np数组 标注
        :param: iteration: int 弱分类器个数
        输入训练集和弱分类器个数, 输出模型
        """
        number = data_matrix.shape[0]
        data_weights = np.ones((number, 1)) / number        # 初始化训练集权重为1/number
        m = Model(iteration)                                # 初始化模型权重为0
        for i in range(iteration):
            stump, predictions, weighted_error = st.create_stump(data_matrix, labels, data_weights)
            m.model_list.append(stump)
            m.model_weights[i] = 0.5 * math.log((1.0 - weighted_error) / max(weighted_error, 1e-16))
            data_weights = data_weights * np.exp(-1.0 * m.model_weights[i] * labels * predictions)
            data_weights = data_weights / np.sum(data_weights)
        return m
|
集成分类器
 1
 2
 3
 4
 5
 6
 7
 8
 9
10
11
12
13
14
15
16
|
    import numpy as np
    def adaboost_classify(input_matrix, m):
        """
        :param: data_matrix: (m,n) np数组,测试集, 样本按行排列
        :param: m: 模型
        :return: models_output: (m,1) np数组,强分类器输出值
        ensemble model, 输入训练集, 返回输出结果
        """
        models_output = np.zeros((input_matrix.shape[0], 1))
        for i in range(len(m.model_list)):
            model_prediction = st.stump_classifier(input_matrix,
                                                   m.model_list[i]['feature_index'],
                                                   m.model_list[i]['threshold'],
                                                   m.model_list[i]['rule'])
            models_output += m.model_weights[i] * model_prediction
        return models_output
|
分类器测试函数
 1
 2
 3
 4
 5
 6
 7
 8
 9
10
11
12
|
    import numpy as np
    def adaboost_test(data_matrix, labels, m):
        """
        :param: data_matrix: 测试集, 样本按行排列
        :param: labels: 标注
        输入测试集和模型, 输出模型参数, 输出结果和正确率, 返回输出结果
        """
        models_output = adaboost_classify(data_matrix, m)
        i_vec = (np.sign(models_output) == labels).astype(int)
        error_rate = 1 - np.count_nonzero(i_vec) / float(data_matrix.shape[0])
    print 'model weights:'+'\n', m.model_weights, '\n'+'models_output:'+'\n', models_output, '\n'+'error     rate: ', error_rate
        return models_output
|
保存模型参数到json文件
 1
 2
 3
 4
 5
 6
 7
 8
 9
10
11
12
13
14
15
16
17
18
19
20
21
|
    import json
    def save_model(m):
        weights_json = json.dumps(m.model_weights.tolist(), indent=4, separators=(',', ': '))
        models_json = json.dumps(m.model_list, indent=4, separators=(',', ': '))
        with open("model/model_weights.json", 'w') as fp:
            fp.write(weights_json)
        with open("model/model_list.json", 'w') as fp:
            fp.write(models_json)

    def load_model():
        with open("model/model_weights.json") as fp:
            weights_json = json.loads(fp.read())
            weights_list = np.array(weights_json)
            size = weights_list.shape[0]
            model = ab.Model(size)
            model.model_weights = weights_list

        with open("model/model_list.json") as fp:
            model_list = json.loads(fp.read())
            model.model_list = model_list
        return model
|
测试用例
 1
 2
 3
 4
 5
 6
 7
 8
 9
10
11
12
13
14
15
16
17
18
19
20
21
22
23
24
25
26
27
|
    import numpy as np
    import adaboost as ab     # adaboost训练脚本
    import test_toolkit as tt # 测试用工具包, 主要用于数据预处理(未展示)
    import plot_roc as plot   # 绘制ROC曲线, 评估模型优劣(未展示)

    # 载入数据
    data_matrix = tt.load_data('test_data/horseColicTest2.txt')

    # 预处理, 测试集/训练集分为8:2
    train_matrix, cv_matrix, test_matrix = tt.split_data(data_matrix, (0.8, 0.0))
    train_matrix_x, class_vector = tt.separate_x_y(train_matrix)

    1. 自己训练-
    m = ab.adaboost_train(train_matrix_x, class_vector)

    --2. 载入预训练-
    # m = load_model()

    -测试模型泛化
    test_matrix_x, test_labels = tt.separate_x_y(test_matrix)
    results = ab.adaboost_test(test_matrix_x, test_labels, m)

    # 绘制ROC曲线
    plot.plot_roc(results, test_labels)

    # 保存模型
    save_model(m)
|
训练结果
1
2
3
4
5
|
models_output:
[[ 1. -1.  1.  1. -1. -1.  1.  1.  1.  1.  1.  1.  1.  1.]]
labels:
[[ 1. -1.  1.  1. -1. -1.  1.  1.  1.  1.  1.  1.  1.  1.]]
error rate:  0.0
|

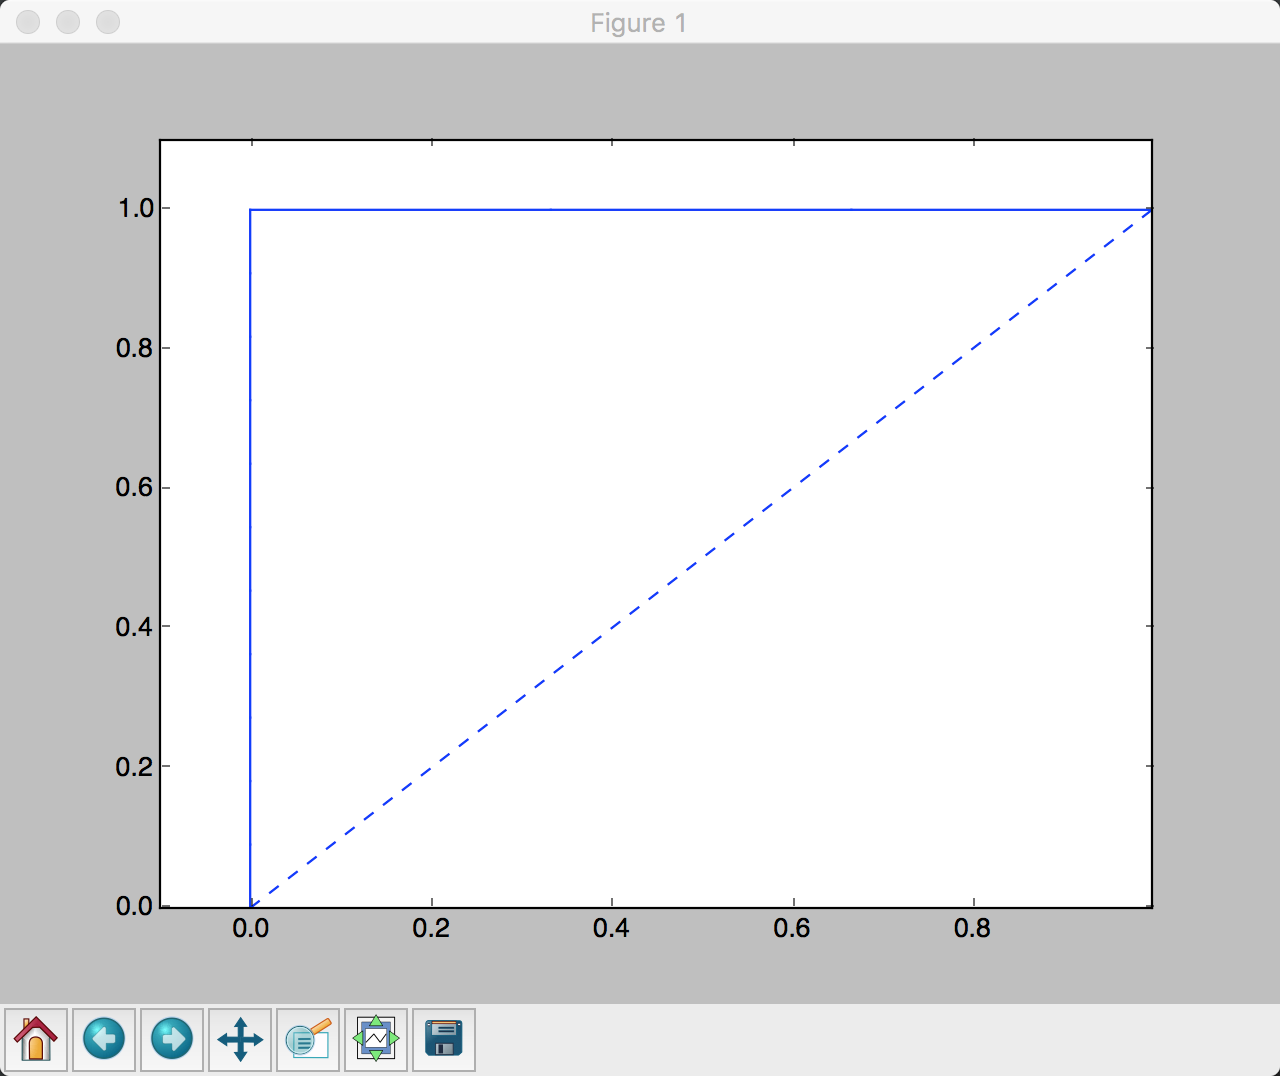
AUC曲线完美, 准确率也是100%.在如此数据缺失, 且特征多的情况下还能达到这么高的效果, 显示了adaboost的强大
2.2 caffe简介
Caffe,全称Convolution Architecture For Feature Extractioncaffe是一个清晰,可读性高,快速的深度学习框架。
- 使用MNIST手写字体数据集训练Lenet
1
2
3
|
cd $CAFFE_ROOT
./data/mnist/get_mnist.sh
./examples/mnist/create_mnist.sh
|
该脚本会下载好训练集和测试集并在./examples/mnist/下生成两个lmdb文件.
caffe生成的神经网络是通过prototxt文件定义的, 其中涉及每一层的参数, caffe可以通过这些参数自动生成对应的层并组合成卷积神经网络. 其中Lenet的prototxt的卷积层定义如下:
 1
 2
 3
 4
 5
 6
 7
 8
 9
10
11
12
13
14
15
16
17
18
19
|
layer {
  name: "conv1"
  type: "Convolution"
  param { lr_mult: 1 }
  param { lr_mult: 2 }
  convolution_param {
    num_output: 20
    kernel_size: 5
    stride: 1
    weight_filler {
      type: "xavier"
    }
    bias_filler {
      type: "constant"
    }
  }
  bottom: "data"
  top: "conv1"
}
|
简单介绍下重要参数含义:
num_output: 输出层维度kernel_size: 卷积核大小stride: 卷积层步长
其他训练通用参数定义在lenet_solver.prototxt中:
 1
 2
 3
 4
 5
 6
 7
 8
 9
10
11
12
13
14
15
16
17
18
19
20
21
22
|
# The train/test net protocol buffer definition
net: "examples/mnist/lenet_train_test.prototxt"
test_iter: 100
# Carry out testing every 500 training iterations.
test_interval: 500
# The base learning rate, momentum and the weight decay of the network.
base_lr: 0.01
momentum: 0.9
weight_decay: 0.0005
# 学习率
lr_policy: "inv"
gamma: 0.0001
power: 0.75
# Display every 100 iterations
display: 100
# 最大迭代次数
max_iter: 5000
# 5000次迭代之后保存模型快照
snapshot: 5000
snapshot_prefix: "examples/mnist/lenet"
# 使用CPU模式
solver_mode: CPU
|
运行完毕之后显示
1
2
3
4
5
6
|
I0126 17:32:32.171516 18290 solver.cpp:246] Iteration 10000, loss = 0.00453533
I0126 17:32:32.171550 18290 solver.cpp:264] Iteration 10000, Testing net (#0)
I0126 17:32:40.498195 18290 solver.cpp:315]     Test net output #0: accuracy = 0.9903
I0126 17:32:40.498236 18290 solver.cpp:315]     Test net output #1: loss = 0.0309918 (* 1 = 0.0309918 loss)
I0126 17:32:40.498245 18290 solver.cpp:251] Optimization Done.
I0126 17:32:40.498249 18290 caffe.cpp:121] Optimization Done.
|
说明准确率达到了99.03%, 损失函数下降到了0.00453533.
- 使用Faster R-CNN进行物体识别
使用了在VOC2006数据集上预训练的模型, 运行demo如下:

3. Demo展示
完成一篇署名博客,博客内容至少包括课程学习心得总结、通过commit/pr等说明自己的功劳和苦劳、提供自己的版本库URL并附上安装运行方法和Demo过程截图、其他重要事项等。
项目版本库
为了将sklearn集成到BloodTestReportOCR中, 还将训练好的模型保存为age.pkl和gender.pkl并在view.py中调用
- 保存模型
1
2
3
4
5
|
# 保存预训练模型
from sklearn.externals import joblib
joblib.dump(clf, 'gender.pkl')
# 其他代码
joblib.dump(clf, 'age.pkl')
|
- 调用保存的预训练模型预测
 1
 2
 3
 4
 5
 6
 7
 8
 9
10
11
12
13
14
15
16
|
# 在view.py中调用预训练的模型
from sklearn.externals import joblib
import numpy as np
# 载入模型
age_clf = joblib.load('age.pkl')
gender_clf = joblib.load('gender.pkl')
# 预测函数
def predict(arr):
    # 根据预训练的模型分别从原始数据中选取不同的特征
    age_vector = [arr[0][i] for i in [2, 0, 14, 9, 18, 17]]
    gender_vector = [arr[0][i] for i in [13, 11, 17]]
    # 按照选取的特征预测
    gender = gender_clf.predict(gender_vector)
    age = age_clf.predict(age_vector)

    return gender[0], age[0]
|
3.1 安装
 1
 2
 3
 4
 5
 6
 7
 8
 9
10
11
12
13
14
15
16
17
18
19
20
21
|
# 安装numpy,
sudo apt-get install python-numpy # http://www.numpy.org/
# 安装opencv
sudo apt-get install python-opencv # http://opencv.org/

##安装OCR和预处理相关依赖
sudo apt-get install tesseract-ocr
sudo pip install pytesseract
sudo apt-get install python-tk
sudo pip install pillow

# 安装Flask框架、mongo
sudo pip install Flask
sudo apt-get install mongodb # 如果找不到可以先sudo apt-get update
sudo service mongodb started
sudo pip install pymongo

# 用sklearn进行预测需要的框架
sudo apt-get install cython python-scipy
pip install -U scikit-learn
pip install pandas
|
3.2 运行
1
2
|
cd  BloodTestReportOCR
python view.py # upload图像,在浏览器打开http://yourip:8080
|
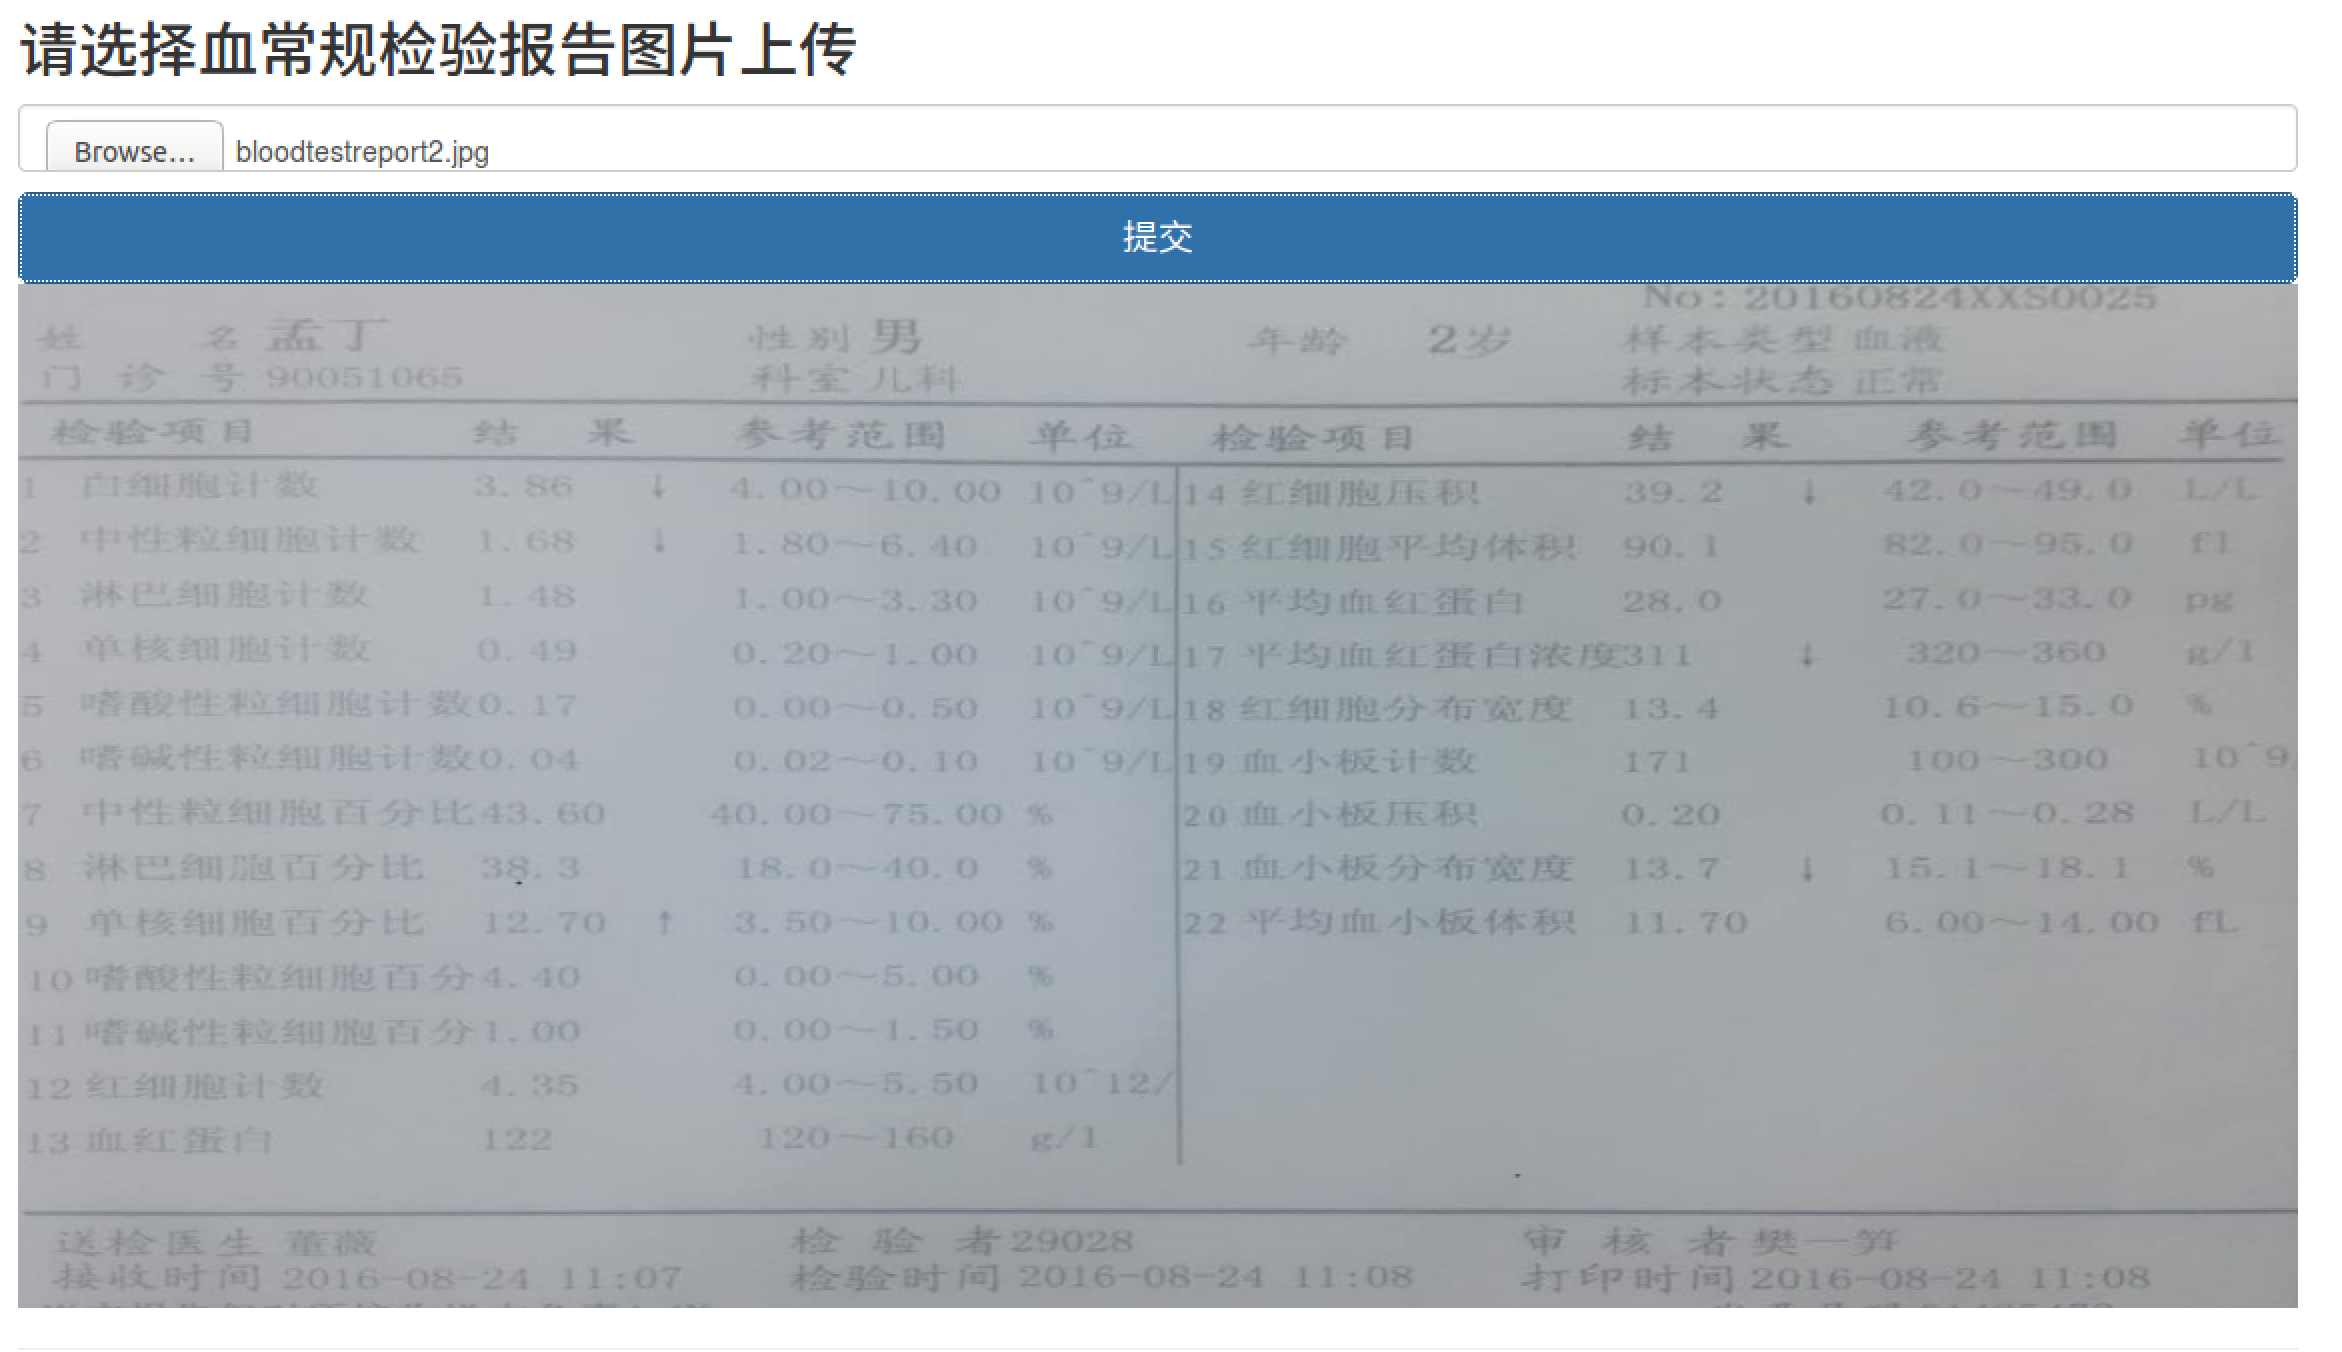
提交图片:

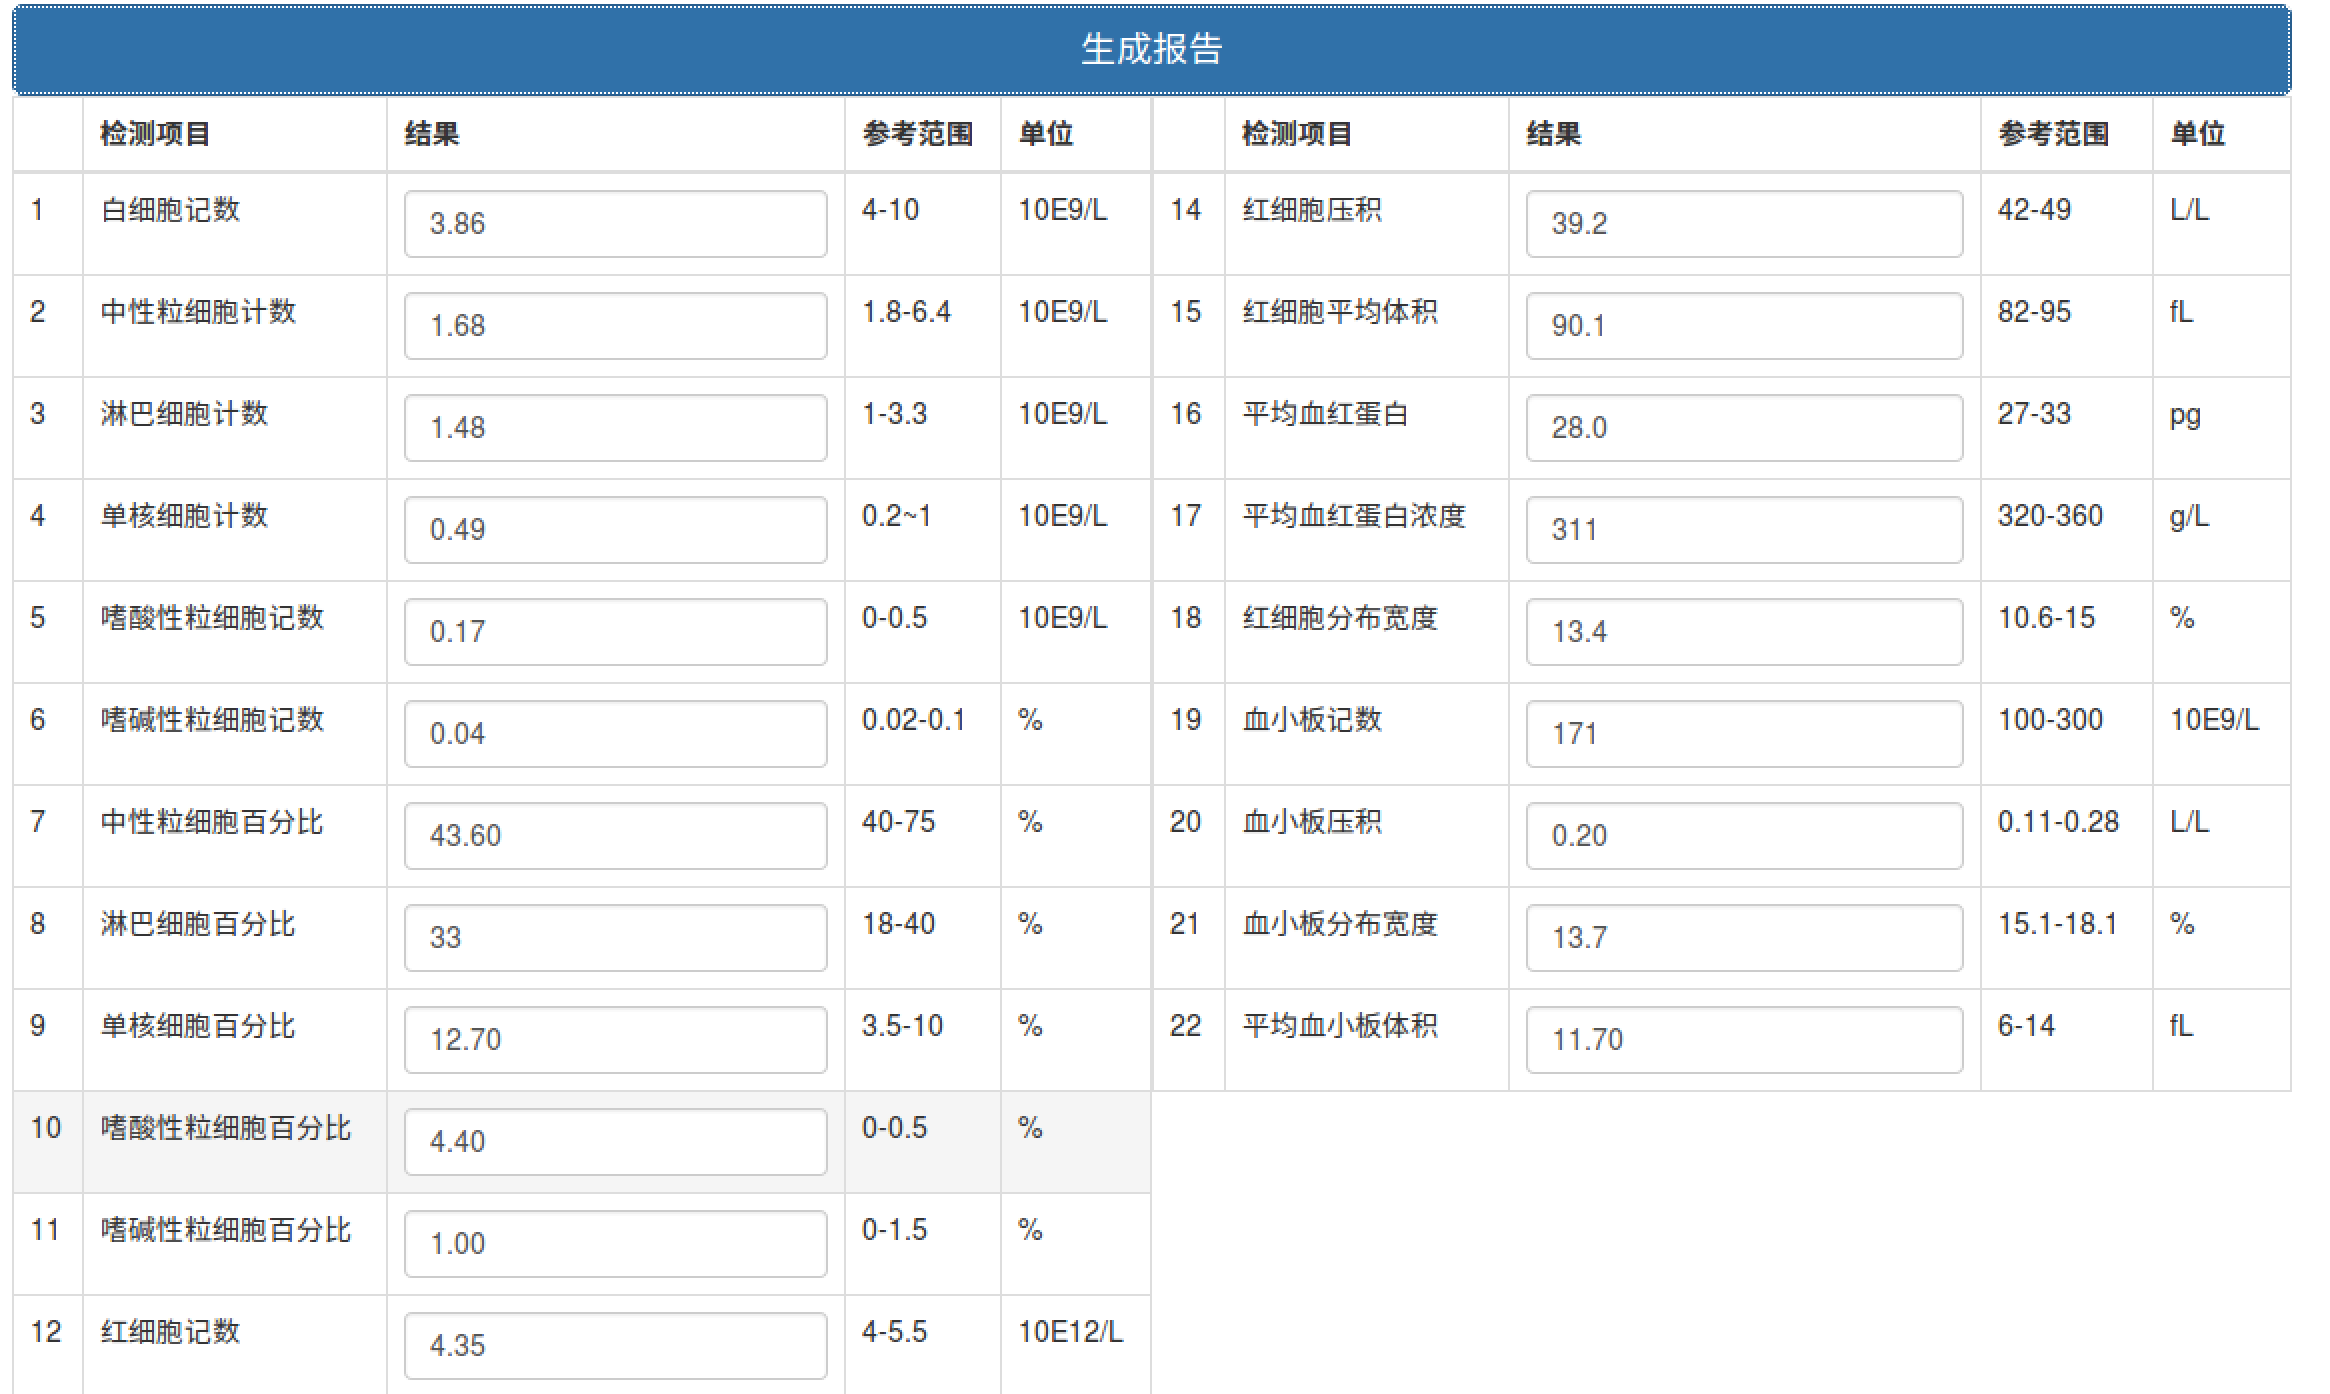
生成报告:

预测性别年龄:

4. 课程学习心得总结
本次课程学习了以下知识
- 课程项目A1a:神经网络实现手写字符识别系统
- 学习了基本前后端输入图片进行检测的原理
- 学习了具有一个隐含层的最简单神经网络的构造: 前向传播, 反向传播的原理
- 课程项目A2:血常规检验报告的图像OCR识别
- 学习了使用github合作项目的流程: 提交pull request, 从源版本库fetch最新版本, merge
不同分支
- 课程项目A3:根据血常规检验的各项数据预测年龄和性别
- 学习了使用sklearn进行预测
- 学习了最基本的数据清洗: 归一化, 标准化, 缺失值填充
- 学习了pandas数据处理包的使用
- 学习了numpy的使用
- Presentation
- 学习了如何使用python编写adaboost, 如何评估模型
- 学习了如何调用caffe, 订制神经网络
本课程学习到了很多知识,对我自己而言, 以python和机器学习的理论知识为主. 孟宁老师也是一个很有风度的老师, 在课堂上和同学们交流, 观点鲜明, 善于抓住每个同学分享知识的重点, 理清楚来龙去脉之后再与其他同学分享, 效果拔群. 感谢孟宁老师给我们带来有如此丰富内容的课程.

 训练集准确率为: 0.983532934132
测试集准确率为: 0.906040268456
 训练集准确率为: 0.843848874
测试集准确率为: 0.373534338358
 训练集准确率为: 0.977473065622
测试集准确率为: 0.649122807018

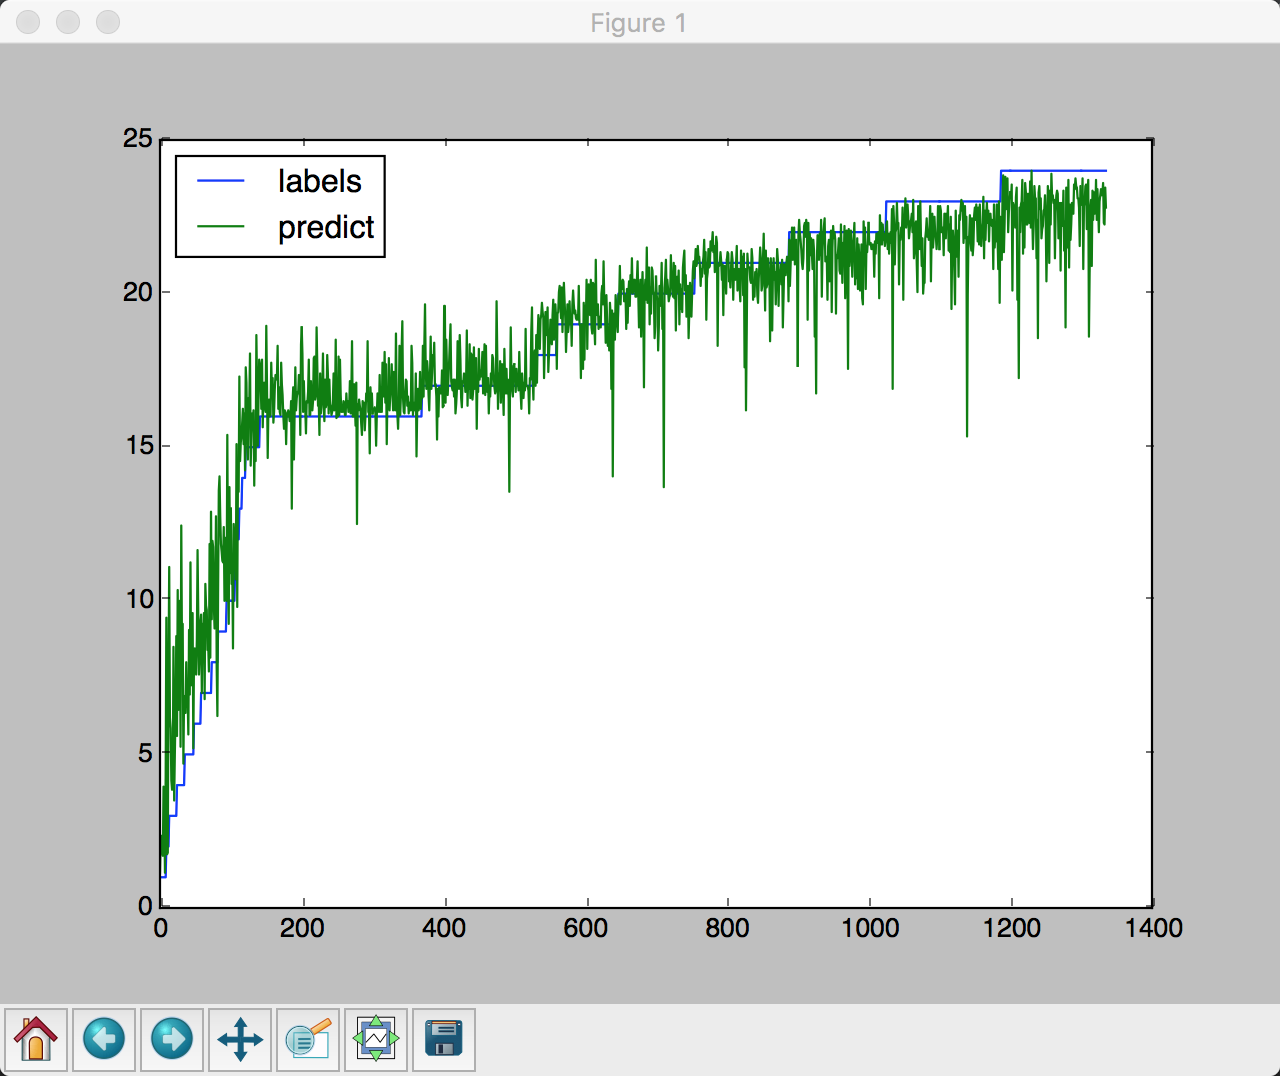
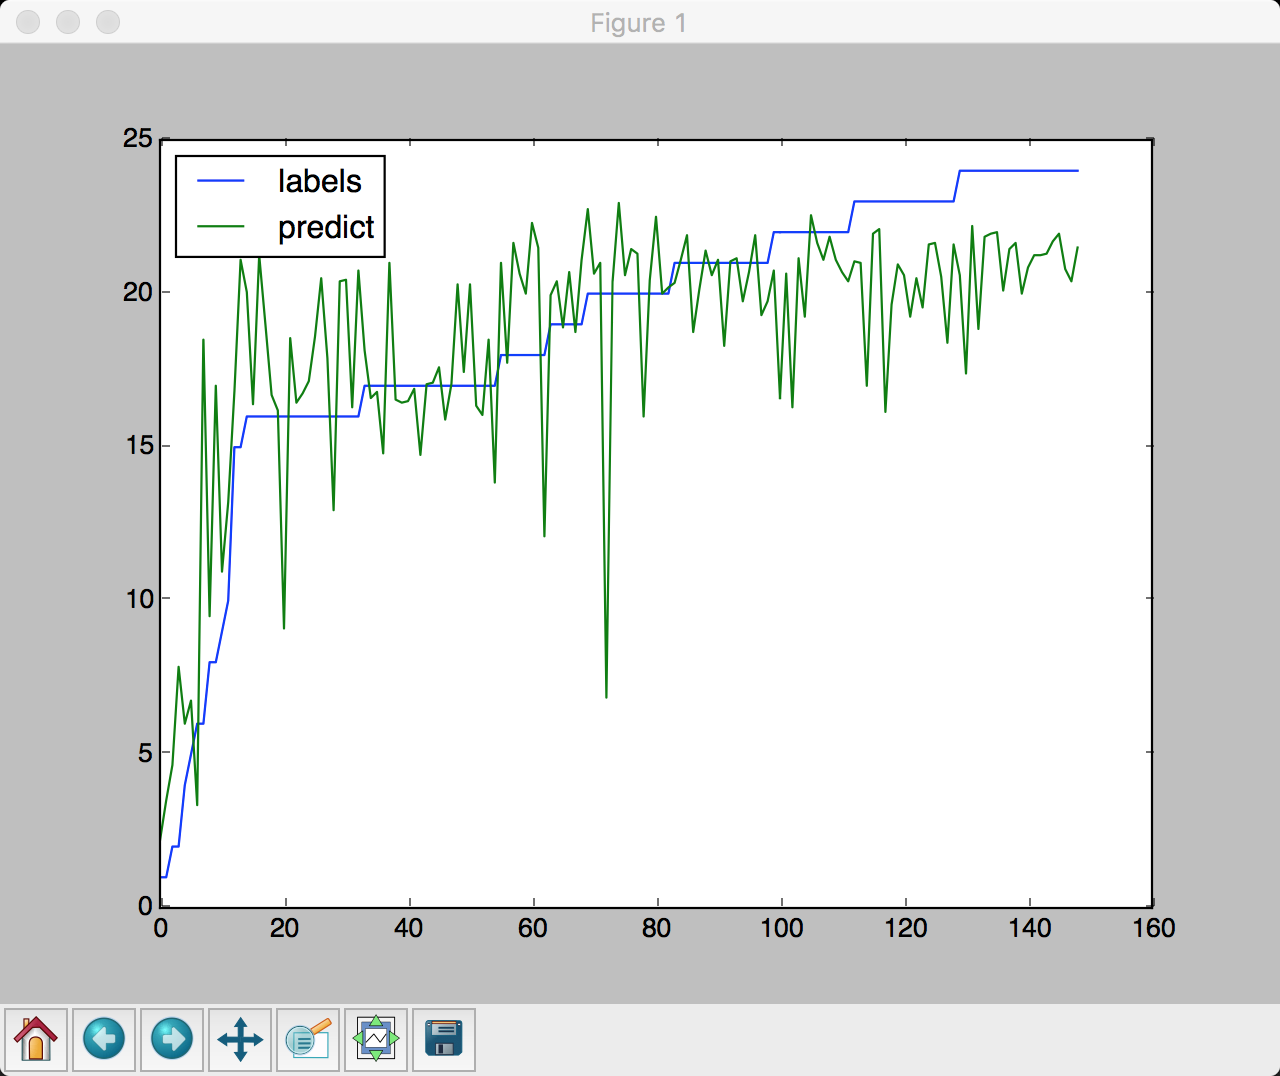 训练集准确率为: 0.983532934132
测试集准确率为: 0.906040268456
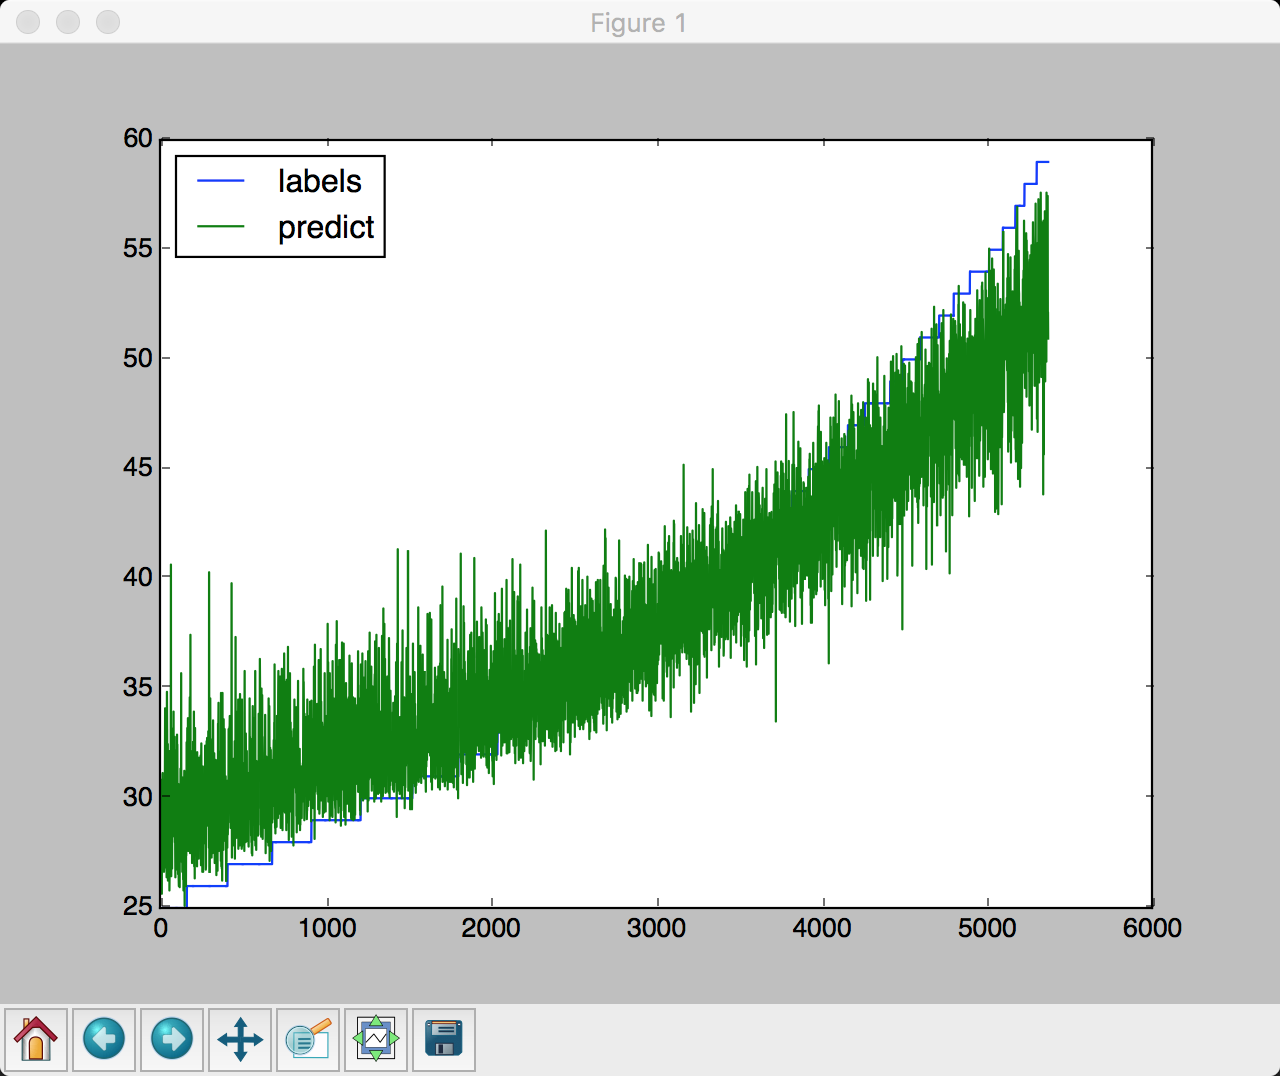
 训练集准确率为: 0.843848874
测试集准确率为: 0.373534338358
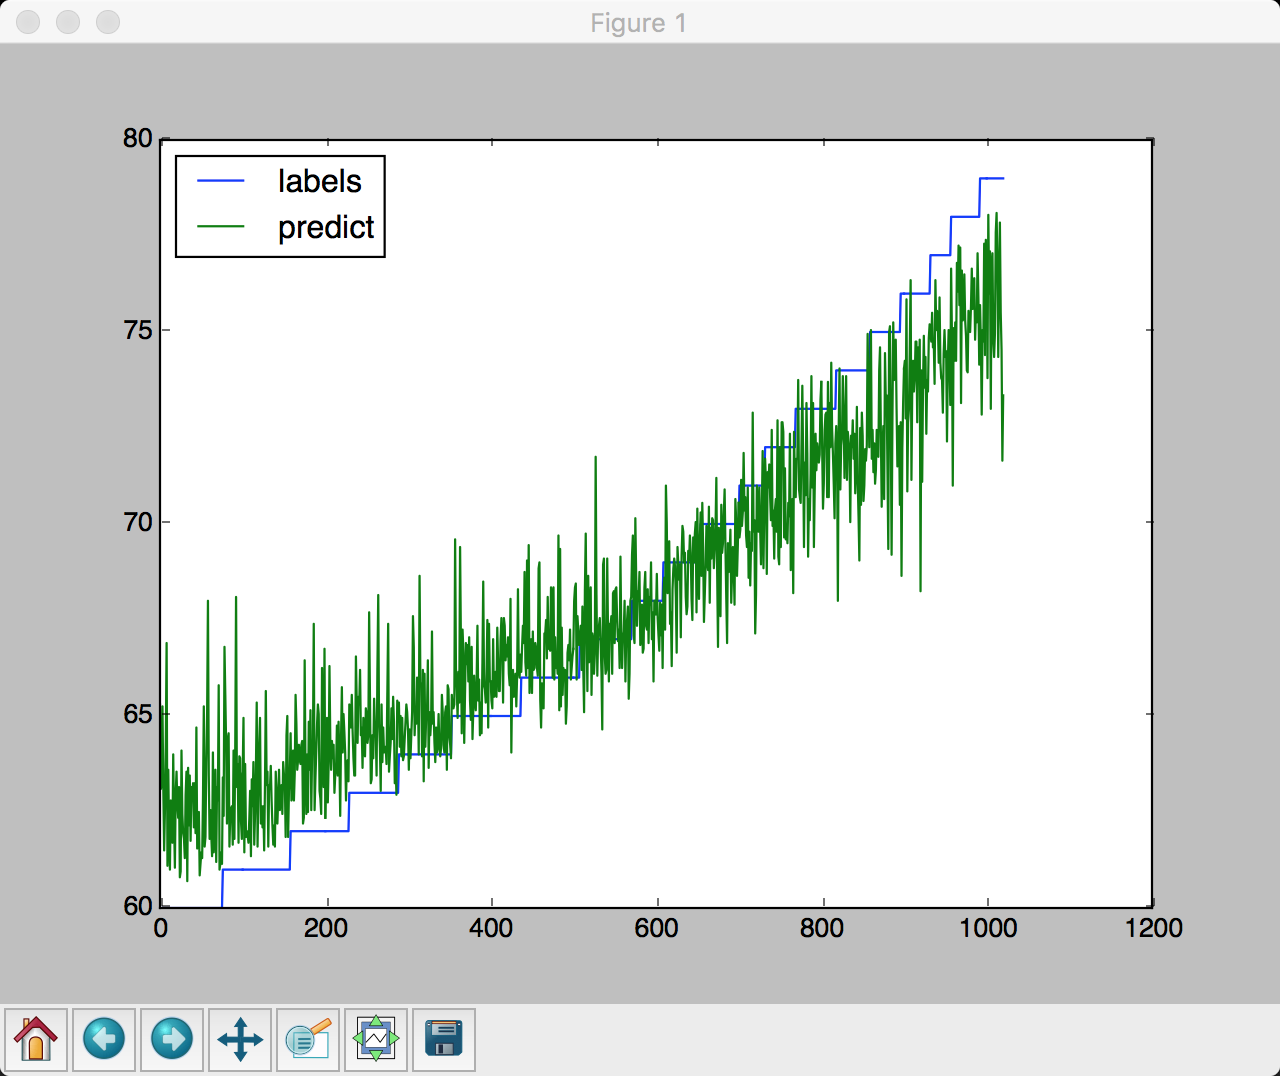
 训练集准确率为: 0.977473065622
测试集准确率为: 0.649122807018